Pages

Showing posts with label process. Show all posts

Tuesday, January 17, 2017

What’s the difference? Story writing verse Hellenica writing.

Salutations! So I’m Siobhan Gallagher(posting from Victor's account), co-writer and editor for Hellenica. This was my first time writing for a game; normally, I write short stories for online and print magazines. And yeah, there are quite a few differences in technique and style, as well as challenges.

For a branching story, you will meet the same characters in different locations at different times, which means some characters will need multiple introductions, and those introductions will vary depending on whether you talked with that character a lot, a little bit, or not at all. As you can imagine, this is a lot of extra writing for just one set of dialogue. For example, you can meet Brasidas as a forlorn-looking Spartan in Rhodes, or trying to buy a train ticket with iron bars in the Acropolis, or as a turtle on the Isle of Circe.

Meeting Brasidas in the Acropolis
Meeting Brasidas at the Isle of Circe
Since there's a plethora of paths leading into a scene, story-related issues crop up. On the one hand, we wanted every choice to have meaningful impact, where the player traveled would effect the layout of the story. On the other hand, the player may miss vital plots points, which would make the entire story less coherent.  One solution to this is to have rumors. It's easy to have a town gossip kick off a conversation about an event outside the player’s path, which informs the characters and can even influence future choices.

You could liken it to building a structure with blocks, where everything has to fit together (or it falls over), but some blocks are interchangeable. Whereas a linear story is more like working with clay, there’s more flexibility in how you might shape it, but still requires discipline--or you wind up with a lousy pot.

If you like science fiction and fantasy stories full of adventure, weirdness, fun or dark (or both!), check out my bibliography--some of these publications are free to read online.

"Lessons in Blade and Barrier" (found in the link above)

Wednesday, April 27, 2016

Building the world of Hellenica

Hey everybody, it's been a while!

Lately I've been living inside our homebrew level editor, putting together the huge number of combat environments that make up Hellenica's world. Obviously it would be rather selfish to keep all of the fun to myself, so here we are. Let's go on a journey of creation!

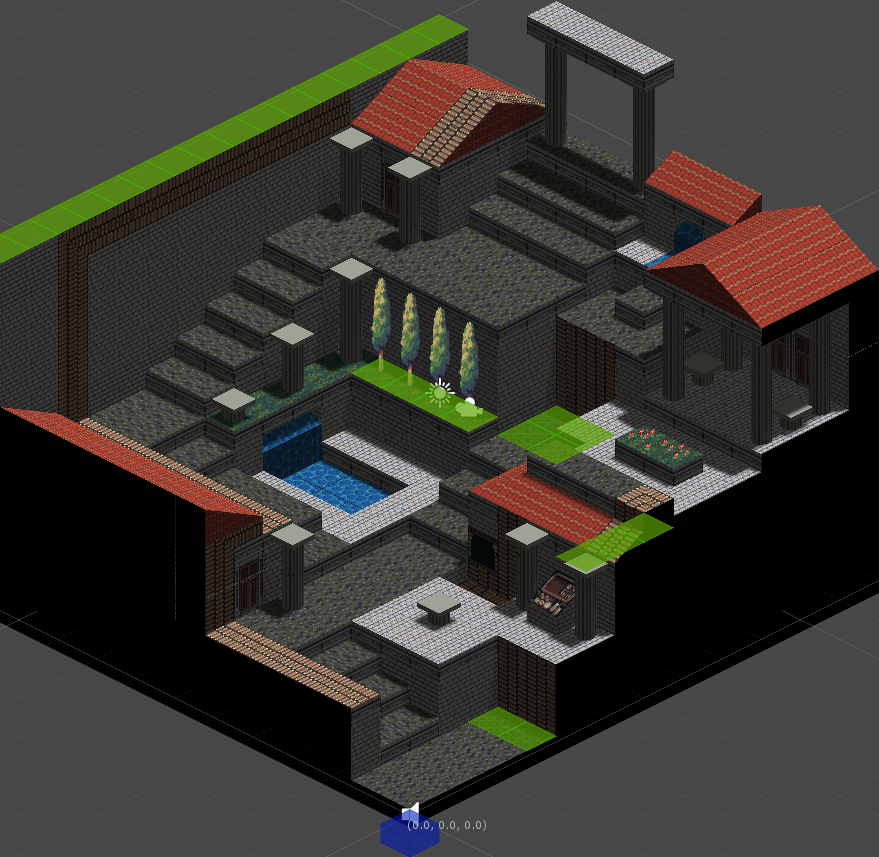
First stop: the end! What? Here's what a finished level looks like in the editor in full, indecipherable, debug glory:


Well, that's not helpful. What say we break this down a bit?

Here's a shot of where things usually start: the level geometry.


Ok, I lied. I typically start in a notebook, but this comes immediately after!

If you've ever built a tower out of legos, you have the requisite skills to build a Hellenica level. That little blue block near the bottom is the cursor, and I move it wherever I need to place a new piece. Most of the time that piece is a rectangular block, but sometimes I bring out more specialized pieces (see the roofs and columns).

Each piece has a texture assigned to each of its faces. When I drop a new piece in, its sides are all set to the same texture (mostly true). In cases where that's no good, I can also paint individual faces using the mouse. Here, I wrote you a message:


Instead of picking a color from a palette like an artist would usually do, I pick a whole texture. Call me greedy. Here's a sample of my palette:


One neat addition we're making to the genre is moving platforms; think elevators, conveyor belts, and magical... platforms. After the player's actions resolve, all the platforms will move a step (which means different things for different types of platforms).

Coupled with Hellenica's repositioning abilities, this opens up opportunities for some exciting new decisions. Do you send your ranged attacker up a lift for a better vantage point at the risk of separating her from the party? Should you push a tough enemy onto a moving conveyor belt to postpone dealing with her instead of focusing your damage on her?

Athens has gone through a serious transformation since the steam revolution, and most levels in the city will feature steam-powered elevators and conveyor belts throughout. This level has a couple elevators and two conveyor belts, one of which wraps around the entire left side.


The squares drawn in the editor are actually just the 'slots' for the platforms. Each platform individually represents a single space in the level, and they move from slot to slot. Squares with a red highlight will start with a platform.

The white arrows indicate the orientation a platform will assume when it enters a slot. The texture we use for the tops of platforms indicates directionality so that a player can quickly grasp how the platforms will be moving in the future. This is a huge help, especially in some of the later levels. ;)

Once the level layout is fairly locked down, I start dropping in the actors that will populate the scene.


Different actor 'groups' are represented by different colors. Typically, these are groups like 'party', 'barrels', 'bad guys'. Sometimes extra groups are defined for special cinematic reveals or triggering logic. More on that later!

Oftentimes, there will be special level logic associated with certain positions. In Hellenica, I'm calling these gadgets. There are two in this level:


These guys spawn barrels and amphoras to keep the moving conveyor belts populated. In other levels, gadgets are used to place hot steam pipes that cause damage, magical traps that probably also cause damage, or friendly abilities that improve your combat effectiveness.

We're most of the way there now, but first we have to make sure the player doesn't cause us any trouble.

By default, the top of every piece is a visitable space for an actor. Unfortunately, trees don't like it when actors stand inside them, something about personal space. So, to avoid complaints I mark certain spaces as untraversable:


In this case, I don't want people walking underneath the elevators or disturbing the trees. Pesky Nephele also likes to vault onto the outer walls, which is probably not Icarus-approved, so that's a no-no.

Ok, it's on to trigger volumes!


On some levels, I don't want all of the enemies to charge at the player's party right away. Everything in moderation, right?

By marking out certain areas, I can link the activation of certain actor groups to the movement of the player's actors. In this way, the player can (hopefully) indicate that she is ready for a fight by moving close to the enemies. (Hopefully.)

Not so bad, was it? Here's a shot of the final product:


(This is an early level, so I don't feel too bad spoiling it for the faithful. Forgive me!)

Truthfully, my process is nowhere near as linear as I've laid it out here. As with any creative endeavor, large portions of time are usually spent wandering the harrowing depths of uncertainty. Lots of experimenting, lots of failing, but hopefully in the end I come up with something great. Having good tools certainly helps.

Hope you enjoyed this write-up! Let me know if there's anything else you'd like more info on.

Friday, April 24, 2015

Sprite palette swapping with shaders in Unity

As any game developer knows, asset reuse is your friend. Whenever the design calls for a new character, I often turn to our existing assets to see if I can create what we need more quickly and cheaply than contracting out another character sprite sheet.

One method for reusing assets is to swap out the colors. RPGs have used this trick for years, and it works just as well in Hellenica.


Every sprite in Hellenica uses a relatively limited color palette. To make a new variation, we just choose a few colors in the palette and assign new colors. Here's what our friendly pirate's color palette looks like:


What I ended up doing is creating a custom shader that takes a sprite and a small palette texture (like the one above) and swaps the colors on the fly.

-- Start of the technical bit! --

Creating the palette texture is pretty straightforward, but I thought it would be interesting to explain how the shader knows which color to use when it's drawing a pixel.

One way to do this is to embed the palette indices straight into the original sprite. But that presents a tricky problem! How can I change the data stored in the image without changing how the image looks? It turns out that it's doable if you don't change too much.

Before diving in to how this works, it's important that we're on the same page regarding digital color. For the purposes of this post, all you need to know is that every displayable color can be represented as a combination of three colors: red, green, and blue, or RGB for short. If you've used a paint program, you've probably seen this before:


If the color depth is sufficiently high, changing these RGB values by very small amounts doesn't change the final color much. In our case, we're using 32-bit color depth, which means each RGB value can range from 0 to 255.

This image contains 64 different colors, but to my eye it's all the same color. You can open it up in a paint program and poke around with the eyedropper to see what I mean.


Starting with a bright red color, RGB(252, 0, 0), I generated all possible color combinations that can be made by adding 0 - 3 to each of the color channels (red, green, and blue). That's 4 * 4 * 4 = 64 combinations.

This is the approach I'm using to embed the palette index into the original sprite. Since all of our character sprites in Hellenica use fewer than 64 colors, I can safely store the palette index inside the sprite pixels without modifying the end result visually.

Here's what it looks like when I modified our pirate friend:


The pirate on the left is the original source sprite, but the pirate on the right is the sprite that I modified. Can you tell the difference?

Here's a visual breakdown of the process for storing the indices:


We support at most 64 unique colors, so that means we only need 6 bits to represent the color index. First, I split this index into three separate 2-bit values. Then I hide these in the two least significant bits of the three color channels (red, green, and blue). As you saw before, since I'm only changing the two least significant bits, the visual impact is negligible.

I put together a little editor script to generate a color palette texture from a sprite and embed the indices using this process. Then I made a shader that can pick out the index and use it to look up the actual color in the palette texture.

Putting all of this together, creating a new variation now takes about as much time as it takes to swap out some colors in Paint.

-- End of the technical bit! --

Here are some variations on our pirate friend and the associated palette textures:


Aside from simpler color swapping, this technique is also amenable to some more imaginative uses!


I'm really happy with how things turned out, and I'm sure I'll come up with more uses as the project progresses. Let me know what you think in the comments!

Saturday, February 7, 2015

Hellenica Environments: Rhodes

It's now week two of post-PAX South life, and we're back into the swing of things. I'm currently in the middle of tweaking combat and building new levels, so it seemed like a good opportunity for an art update!

This week's travel destination is Rhodes, an elevated island city surrounded by a great wall on one side and staggering elevated docks on the other. Led by the so-called Mechanist-King Evagoras, the island nation is known for its theomechanical marvels as well as its generosity towards its allies and those in need.

We actually began work on Rhodes before Daniel, our environment artist, started working with us. At the time, we were still searching for the right partner, and we decided to give Collateral Damage Studios a trial run with Rhodes.

To start off, we wanted to work out the important elements unique to Rhodes. This meant figuring out how the steam-powered ship lift worked and what the Colossus of Rhodes may have looked like. We also knew we'd need to include some other elements for story reasons, so we tackled those as well. This exploratory part of the process is always my favorite.


A couple of the lifts relied on some questionable physics, so we decided on the rightmost implementation. In general, we were pleased with most variations of the other elements, though we really liked the mechanical solar system installation on the observatory.

With some more concrete details in mind for these elements, we started thinking about the composition of the scene.


We knew we wanted a dramatic view of the harbor that showcased the Colossus as well as the elevated docks. The first option actually worked the best for us, as it provided a nice vantage point from which to view the cityscape in the background. After a little more playing around with the finer points, we settled on option B from the second image. The airy, open feel of this composition provided a nice contrast to some of our other city locations that feel more cramped and urban.

Once that was settled, the artist took off towards the final image. CDS was great about keeping us posted on the various stages involved along the way.


This is where things stood at the end of our trial run with CDS. They exhibited an incredible attentiveness when it came to the fine details, and their transparency throughout the process was fantastic.  We were quite happy with how the final image turned out, but unfortunately the scheduling just didn't work out when it came to a continued partnership.

Now, jump ahead several months with me. Daniel had been on board for a while and was turning out great work on our other locations. We decided that we wanted him to go back over Rhodes and ensure it matched the style of his other pieces. This mostly entailed intensifying the lighting and shadows to match his preference for more dynamic lighting. Flip back and forth between the two images to see the differences.


Notice anything else that's different?

The Colossus and the boats are huge now! Unfortunately, we lost the staggering height that was critical to the island's identity during the transformation, as Daniel had dragged in the Colossus and resized the boats in the harbor due to a miscommunication on our part.

Luckily, this worked to our favor in the end. With a quick change to the horizon, a few additional ship elevators, and some architectural duct tape to help hold up the docks, Daniel was able to make the sense of scale even more pronounced than before.


So there you have it: Rhodes. And if you happen to be in town, don't forget to ask Evagoras about the elevators' auto-load balancers!

Wednesday, October 22, 2014

This changes everything

Every once in a while we implement a change in the project that makes me wonder how I ever enjoyed any of the previous versions. The last couple weeks I've been using some cycles to get our characters animating, and now that Diona is running and jumping around our little worlds, I just can't go back to our older builds. It's SO good to see our characters come to life on the screen!

Here's a quick video of some of her animations in place.


This is the animation graph I'm using to control her:


As far as animation graphs go, it's fairly simple. You can think of each rectangle as a single animation (idling in place, running, or shooting her bow), while the white arrows between the rectangles represent possible transitions between those animations.

So, for example, the arrows connecting diona_run to diona_hop allow Diona to immediately perform a hop while she is running. But, since there are no arrows between diona_run and diona_attack_bow, she has to stop moving and return to the diona_idle state before she can attack.

The nature of our turn-based combat means we can get away with a fairly simple set of transitions, as opposed to say, a real-time shooter game. Here's one part of an animation tree (a specialized kind of graph) from a recent Battlefield game:


It's not unusual for a large AAA studio to have a couple of programmers and a dedicated animation team spend all of their time refining the animation tree of the protagonist character. Maybe for our next game. ;)

I also put together some quick footage I took running around one of our test levels. Take a look!


Now that everything is in place, it's fairly simple to plug in the movement animations for our other characters, and that means our game is quickly coming to life!

Stay tuned for more!

Saturday, October 11, 2014

Level construction and keeping focus in the Unity editor

Up until now, creating the geometry for a level in Hellenica was controlled entirely through keyboard input. Here's what it looked like:


It's a cinch once you pick up the hotkeys, and now that I've been using it for a few months, constructing the geometry for a level is one of the quickest parts of the process.

Recently, we've been thinking about how to layer on Valery's art to make our environments more appealing. I decided it was going to be cumbersome and complicated to paint specific faces of the level blocks using keyboard hotkeys. The time had come to add mouse picking to the editor interface.

I immediately ran into issues dealing with Unity's default mouse picking behavior, though. Whenever you click on a GameObject in the scene view, Unity changes its focus to that new object! Generally, this is exactly what the user wants. In our case, however, painting tiles becomes very difficult when every click changes the user's selection!

After some internet research and experimentation on my own, I ended up with a solution that works well for us. It comes down to overriding Unity's GUI focus for the duration of the painting operation. Here's a quick sketch of how this is done:

 ...
else if (Event.current.isMouse)
{
process_mouse_input(Event.current);

// if we detect a left click while the mesh editor is selected,
//   do not allow Unity to change our selection. assume we're editing
//   until we release the left mouse button.
if (Event.current.type == EventType.MouseDown && Event.current.button == 0)
{
    // hotControl is a static variable that Unity uses to track the
    //  active GUI control
GUIUtility.hotControl = m_editor_control_id;
}
else if (GUIUtility.hotControl == m_editor_control_id &&
Event.current.type == EventType.MouseUp && Event.current.button == 0)
{
GUIUtility.hotControl = 0;
}
}
 ...

I begin overriding GUIUtility.hotControl on the MouseDown event and hang on to control until a corresponding MouseUp event to guarantee that the editor captures clicks as well as sustained drags.

m_editor_control_id is generated as follows:

m_editor_control_id = GUIUtility.GetControlID(this.GetHashCode(), FocusType.Passive);

As you may be able to tell, this solution isn't perfect. Any gizmos that end up in front of the level mesh will be unresponsive to mouse clicks so long as the mesh remains behind them, as the mesh editor is now all-consuming. (Muahaha.) But, it works well enough for us to get started painting levels.

Here's a quick gif of a paint job I did with some test tiles:


I have no doubt that this system will keep evolving as we go. If anyone out there has any ideas for improvement, let me know!

Thursday, April 3, 2014

Combat prototyping

I've been doing a lot of combat level prototyping lately, so I thought I'd provide a brief glimpse into my process.

We're going to have a large number of levels that take your party to very different locales, but when designing each one, my approach is similar.

As with most things in our game, the story comes first. To start, I first collect all of the necessary story elements that I may need to convey in a level. Are there any special events that should take place or characters that should be introduced? Where will the combat likely occur given the current status of the party's journey? Sometimes larger story arcs specify dialogue that needs to take place in a level, and other times I'm free to come up with my own chunk of narrative.

Oftentimes, these details will help me define the overall flow of the level and the broad strokes of the composition. For instance, if the party is waylaid at sea by a band of theomechanist pirates, I know that I'll be building an encounter on boats with lots of nice choke points, and there will be some fun banter between the pirates and the party.

Once the story details are understood, I think about any specific gameplay design goals I may have. In the early levels, I usually focus on teaching the player the mechanics of combat and helping them learn tactics that will benefit them in later levels. I also want to make sure that there are plenty of opportunities for the player to exercise their newfound skills.

During this stage, I usually play around a lot with various level layouts, either by drawing on paper or creating quick whitebox levels. We have a snappy editor built in Unity that allows me to build out a tactics level in just a few minutes.

Here are some example levels where I was playing around with height. There are opportunities for the player to exploit ranged attacks from on high, as well as use their push abilities to damage and displace the enemies.


Creating these rough whitebox levels also allows me to pinpoint problem areas before we invest too much time into polishing them. Here's a whitebox level that was fun to play but quite confusing to look at due to the overlapping tiles in the bottom right of this screenshot.


Sometimes I'll do a quick coloring pass over the whitebox level to help communicate a special feel for the location. It's a cheap way to help the player understand a scene before we are able to invest in completing the art for a level. It's surprising how much information you can glean from a few simple colors and shapes.


As with any challenge in game development, these levels are constantly in flux as I receive feedback from players, but you may very well see these levels in the game some day!

Hopefully this little peek into my process was insightful. I'm still learning and adapting, but every level feels like it's better than the last.

Let me know if you have any questions, I'm happy to dig in more if there's interest.